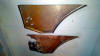
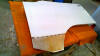
The first step is to make a copy of the rusty section that was removed. Lay out the panel, relief notch the metal, and fold the edges up to match the original.
Add the three hinge screw holes and we’re ready for a test fit.
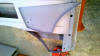
The entire inside of the door and patch panel were sealed up to keep the rust demons at bay and the panel is ready to attach. The panel may not be exact the first try but take your time and trim it to fit as door clearances are extremely crucial and you only want to do this once!
The inside panel is now tacked in place. Skip welding is also very important as too much heat can wreak havoc on thin metal panels.
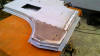
The inside is now completely welded up. Some light grinding with a multi-flap wheel and this side is good to go.
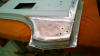
The outer skin had a few different gremlins to deal with. It appears that the overextended door crease was pulled out with holes drilled in the door and a slide hammer, yikes! With this all metal restoration Kevin will weld up all the offending holes and metal finish the door back to factory specs.
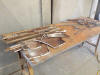
A little here, a little there can really add up! These are all the rusty sections that were removed from this really clean M-677. All these techniques can be transferred to your project with a little time and finesse.