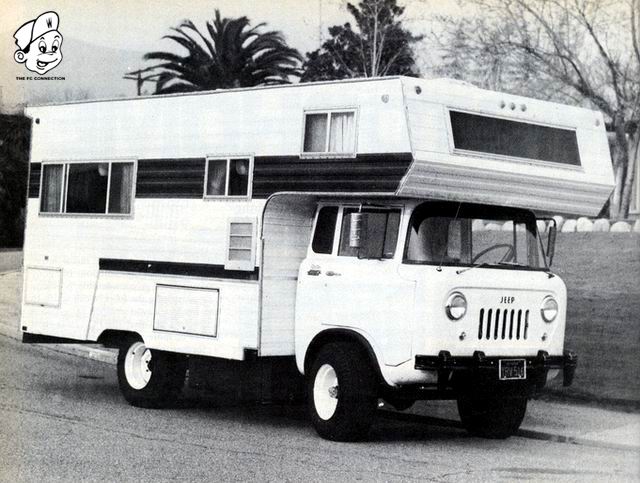
Blair Hilborn wanted a camper with all the conveniences of a home and 4WD to boot...so he built one on an FC-170 Chassis.
Story and Photos By Blair Hilborn
In October of 1972 we sold our old camper and, having cash in had, we started looking for a 4WD rig. It did not take us very long to find out that unless we spent around ten thousand dollars we would not be getting much. We went to all the sportsman and camper shows hoping to find some sort of 4WD camper within our means. The only 4wd setup that we saw, after viewing three shows, was a camp-type trailer that had been made for towing by a small Jeep universal. We own a CJ-2A in which I installed a Buick V-6 engine, Olds Turbo-Hydro 400 trans, and Warn overdrive. Even with this combination we felt that we wanted to find a more roadable vehicle for those long trips. We also felt that we could be more comfortable and tow the CJ-2A.
During this period of time, a friend of mine, who lives in San Diego, was rebuilding an FC-170 Jeep truck for recreational use, I spent a considerable amount of time observing and taking measurements to determine if it would be feasible to build one into a mini-motorhome. I was able to obtain an owner's manual for an FC-170 and found in it much needed information.
The FC-170 was built by Kaiser Jeep from 1957 to 1962. They also built an FC-150, which is like a small half-ton truck. The FC-170 came in three models, the 7000 gvw came with a 3-speed trans, the 9000 gvw came with a heavy duty 4-speed and is also considered to be rated as a 3/4-ton truck. They also made a 1-ton series, which is what I was looking for but could not find; the wheelbase of 103-ins. is the same on all three models of the FC-170. I settled for the 7000 gvw.
After much thought I decided to go ahead. My wife is like most women and could not envision what something as gross-looking as my descriptions to her, would turn out to be. Plus my plan was to spend around $2500, and being the conservative member of our family, she just could not get excited over the idea of spending that much money and having an old junker.
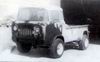
The next step was to find a reasonably priced FC-170. Being employed by the Riverside County Sheriff's Department, gave me a very large area in which to look for one. While on patrol in the Anza area (near Anza Borrego Desert), I found one parked in a septic tank storage yard. In checking it closer I found that someone had pulled out the old Continental inline flat head six. I contacted the owner who stated that he had thought of installing a Buick V-6 but had not worked on it in months. I bought it for $225. From that day on, for almost one year, all my spare time was spent in my workshop. Because I was so slated to find an FC-170 for a reasonable price, I neglected to look at the body close enough. After I bought it home and started working on it, I saw that the body was rusted out in many places. A registration check determined that it had been in Huntington Beach, Calif., for several years. For a starter I took the cab and bed off the frame. The frame was then sanded down and later painted with rust resistant paint. Both front doors and door frame area were so bad that I had to cut sections and weld in new panels. The previous owner had mounted a spare tire to the metal cab front which had vibrated and ripped much of the front sheet metal loose; this with the combination of body cancer, posed a considerable problem.
|
|
|
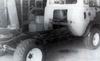
In comparing the FC-170 cab width to the modern newer camper vans, one is quick to learn that the FC-170 is eight inches or more narrower; this presented a further problem when determining what engine to replace the old flat head with. Because I am so happy with the performance of my Turbo 400 trans in my CJ-2A, there was no doubt but what I wanted to put a Turbo in the FC-170. Also this again limited me more as to what engine I could use. The first thought was a 350 Chev. but the price with a Turbo was much more than I wished to spend. So I looked at a 300-cu. in. Buick Special engine. This looked very good because it was even more narrow than the small block Chevy and the torque range looked pretty good for a small block engine. I located a complete 1964 Buick Special for $125. I pulled the engine and Turbo 350 and sold the body for $50. With the help of a friend who lives in San Diego, and my brother who owns Hilborn Transmissions in San Bernardino, Calif., we were able to adapt the Turbo to a 1965 Jeep Wagoneer transfer case. This transfer was used because it makes less high speed whine. In the past, when adapting the Turbo to the Jeep transfer we used adapters much like those advertised in FOUR WHEELER. Because I wished to cut down some on expense, a machinist friend designed and built an adapter, at a cost to me of less than $40. He has four of them out now and all appear to be working well. My brother built my Turbo 350, "beefed" it some and also put a shift kit in that helps when towing my CJ-2A.
I rebuilt the Buick engine back stock and started mounting it. The original engine was mounted some 20 inches back from the front of the frame; I wished to mount my Buick further forward for better weight balance. It ended up all the way forward directly over the front differential. I used a '67 Imperial four core radiator, because the fill for the radiator would be under the dash I had to adapt a second tank further back to fill it; a corvette auxiliary fill tank was used. I adapted a 1967 1/2 ton Chev. truck power steering pump to the engine The Saginaw steering box was mounted to the frame; I also used a tilt steering column and wheel out of a Buick.
It was obvious that the suspension for this vehicle would need "beefing" because of the size camper I wanted to use. I built top mounts for Ford truck 3/4-ton Monroe spring shocks for the front. Other than the heavy shocks, the front suspension was left stock. Because I have driven the big California Highway Patrol Dodges and like their very stable handling, I did some research as to why they were so stable. I found that a 1 1/4-in. thick sway bar is rubber mounted on the Dodge frame and there are bars leading from each end to the differential. The bar makes the vehicle more stable. I had very little problem finding a wrecked unit, and for $5 the sway bar was mine. Without too much work the sway bar was adapted to my rig. I also built double shock mounts and used heavy duty shocks on it. I still felt that more strength was needed in the rear suspension, so I bought a set of heavy duty Helwig camper special overloads. With this I felt the vehicle should be stable.
The gear ratio was determined to be 4.88 and much too low for highway driving. After extensive checking I found out that Jeep used a Dana 53 housing in the rear and a Dana 44 housing in the front. There was no problem getting any gear ratio for the front but the rear was something else. The only other vehicle that ever used a 53 housing was a Lincoln. When I contacted Lincoln in an attempt to get some gears they just laughed at me. I was looking for 3.73 gear ratio. Lincoln '51-'53 made such a gear ratio, but finding one would not be easy and I could not be sure that if I found one I could put them in my housing, so I dropped that idea. Someone told me that Rancho Jeep in Paramount, Calif., could get some gears for a Dana 53. I called them and determined that the best they could do was 4.09. There being very little alternative I settles for that ratio. (Now that I have tried that ratio I think it is the best considering my engine power, vehicle, size and weight.)
The next step was to cut out the old engine box and replace the cab over the engine. The engine fit so tight that after the engine cover was finished both seats were over the top of the valve covers. Sheet aluminum (1/16-in.) was used to build the engine cover. Because of the wheel wells being in the way, along with the engine being mounted clear under the dash, the engine cover was very difficult to build. In fact it was the most difficult problem I ran into, building the complete rig. I built the cover in three pieces; the top slips over the top of the engine and into a grooved frame that was riveted to the inside of the front cowling. Both sides of the engine cover then were clasped to the top cover and floor. To keep some of the engine noise down, spun glass was glued to the inside of all the covered panels. So that contact could be sprayed through a spray gun, lacquer thinner was used to thin the cement. A layer of nylon cloth was glued to the spun glass and the last layer was heavy duty aluminum foil. I pop-riveted thin strips of sheet metal all around the edges and stress points. The combination of this insulation and some household carpet and padding on the outside made good sound proofing and heat insulation. A hinged door was made on the top of the cover for checking water and oil.
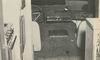
A Mark IV type air conditioning unit was used. The evaporator was mounted on the center of the cowling; the dash was formed of sheet metal around the unit. Stewart Warner-speedometer, gas, oil, temp, and amp gauges were mounted in a cluster above the steering column. An AM/FM radio and tape deck combination was mounted in the dash in front of the passenger seat. The complete dash was covered with 1/2-in. foam rubber and then with simulated brown leather, again contact cement was used to glue down the foam and leather. Pop rivets were used around all edges on the inside to keep the leather tight and in place. Bucket seats, out of a 1972 Dodge van, fit very tight but are comfortable. Behind both front seats and below the floor there are two large storage areas. The factory utilized the passenger side for the battery; there was no problem mounting two large 12-in. by 8-in. 12 volt batteries in that side. To my knowledge the same size area on the driver's side was not utilized. I used this area to mount a large water heater from a bus with vent outlets leading to the front and rear into the camper. The factory heater had been mounted in the center where my engine is now.
Jeep has always been known for having bad brakes and the FC-170 is no exception. I have future plans to adapt 1960 Lincoln car brakes to the system. The stock system, new throughout, was not sufficient. So I found a Hydravac in a wrecking yard that came from a 3-ton truck. The brakes were improved 100% with the Hydravac in the system. I wished to keep the height of 16-in. wheels but wanted something wider. In checking the original tires, it was determined that they were about the same height as 10-16.5. Wishing to get the most stability and to keep my gear ratio as high as possible, I decided to buy 12-16.5. Wheels (6-in. wide) were banded to 10-in. mud and snow tires (10 ply) were used on the rear and 10 ply street tires were used in the front. The spare is mounted under the rear, between the back of the frame and the front of the bumper.
During the time that all this work was being done to the truck, we were looking for a camper to mount on it. We looked at many. We finally found a 1971 Weekender, fully self-contained, slip-in camper that appeared to be just what we were looking for. There were a few problems, like the 30-gallon water tank was mounted in the center of what was to be the walkway from the cab into the camper. The walkway was a little longer than I had wished but, as it turned out, neither presented any great problem.
The old bed was remounted back on the frame and all the sides, fenders and tailgate were cut off. The top and back were then cut out of the cab. The camper was then placed on the flat bed. After numerous measurements and having the camper on and off the truck many times, I matched the cut in the cab to the camper. Aluminum L metal was formed all around the cutout area and riveted to the cab. After the camper was set in place for the last time, screws were sent into the camper from the aluminum frame. A generous amount of silicone was used around the complete area for a good seal. Once the camper was mounted on the cab, uprights were welded on the box and the camper was bolted to the bed; plus lags were sent down through the floor. At this point I was so excited to see what the thing felt like on the road; I piled my wife and two kids in the camper and we drove around the block. It was just unbelievable! I could take it up to about 60 mph, whip the wheel back and forth, and "the old girl" was as steady as a rock. She did not lean whatsoever and appeared to have enough power, although I was not nearly finished adding all the weight.
The 30-gallon water tank was mounted on a welded steel cage in front of the left rear wheel well. The rest of the area around the tank was floored in and a door was cut out so the rest of the area could be utilized for storage. There are two doors on each side of the bottom side walls that gain entry to this storage area from the inside the camper.
Four angle-iron braces were welded to the box under the floor to accommodate anything heavy that I might want to put in the box. I also covered the underside of the plywood with sheet aluminum to prevent weather deterioration of the wood. All joints and outside bottom of floor areas were undercoated also. The outside was then covered with corrugated aluminum to match the color of the rest of the camper. A slight radius for the rear wheel put the finishing touches on the panel. The other side was made in much the same manner, but a larger 17-in. x 36-in. generator door was used. The floor was built strong enough for the future use of a generator. The storage area on the passenger side is large enough to store our folding lawn chairs up over the back wheel and there is still plenty of room for my toolbox and much more gear.
To date we have not come close to filling our storage compartments and that is really saying something if you can imagine everything my wife takes even for a short trip. I mounted a 40-gallon gas tank under the storage compartment on the passenger side; the gas tank to off-set the weight of the water tank on the other side. The 40-gallon auxiliary tank, along with the factory 22-gallon gas tank that is mounted in the center in the rear, gives me a total of 62 gallons of gas.
The only major change made inside of the camper was to the queen size cabover bed. The bottom board of the bed was cut, and a long hinge was attached so the bed could be folded back. This was done so one can stand up in the driving area.
The camper sleeps four and is equipped with toilet and shower, 25-gallon holding tank, pressure water system, 6.5-gallon water heater, four burner stove and oven, 6-cu. ft. gas electric refrigerator, and there is an abundance of drawers, closets and cabinets for storage.
In the 2000 miles we have put on our motorhome we have been impressed on how well it handles, even in heavy winds. We tried it out at Pismo and drove through the dunes into camp pulling our CJ-2A without any problem. The rig weighs approximately 7000 lbs. and gets about 10 mpg. We are planning a trip to the tip of Baja in November this year and hope our motor home does well.