|
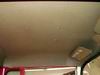
Ernie Cable had a problem with the sagging
headliner in his Forward Control Jeep. He sent me this step by
step solution that should put the headliner problem to rest once and for
all! Thanks Ernie. 1) I removed
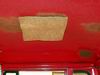
the headliner and the original 12"x12" piece of felt.
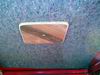
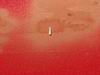
2) Using a grinder, I cleaned the paint off an area about 2"x2" in the
center of the cab roof. I drilled a 7/32" hole in the roof and tapped
the
hole using a 1/4"x20 tap. I screwed in a 1/4"x7/8" long stud flush with
the outside of the roof and put a jam nut on the bottom to hold the stud
in place temporarily. I welded the stud in from the top side, ground it
flush, coated it with some trusty Rustoleum primer and removed the nut.
3) I then cut out 3/8" carpet felt/jute using the headliner as a
pattern.
I also cut a 5/8"x12"x12" piece of plywood, beveled the edges and
drilled
a 1/4" hole in the center. Using a 3/4" paddle bit, I countersunk one
side
of the ply the depth of a nut/washer, then cut a slot in the center of
the
felt and raised it up into place using the plywood to hold it up . I
centered the felt and tightened the nut, then glued the felt to the
underside of the roof.
4) I reinstalled the headliner using larger washers to span torn screw
holes front and rear. Using a piece of wire to find edges of the
plywood,
I installed four screws through the headliner and into the plywood.
A nut plate could be epoxied to the roof rather than welded so as not
damage the paint. |
Adding Stud |